Keratin Extensions / Nail Hair
Keratin Extensions/Nail Hair gives you long hair that lasts!
The extensions can stay on the head for up to three months, are attached with wax, and available in over 40 different colours.
What are Keratin Extensions/Nail Hair extensions?
Keratin Extensions/Nail Hair is Rapunzel’s longest lasting hair extension solution. The attachment is applied using a connector tool and the extensions can stay in your hair for up to 3 months. This means you can sleep, train and have a lot of fun with your new hair during these months. The extensions have small attachments, which make it easy for you to put your hair up and create wonderful hairstyles. Keratin Extensions/Nail Hair is a method that works well to both lengthen and add volume or to create colour effects. Remember to check the attachments regularly to see if they’ve not grown out too much.
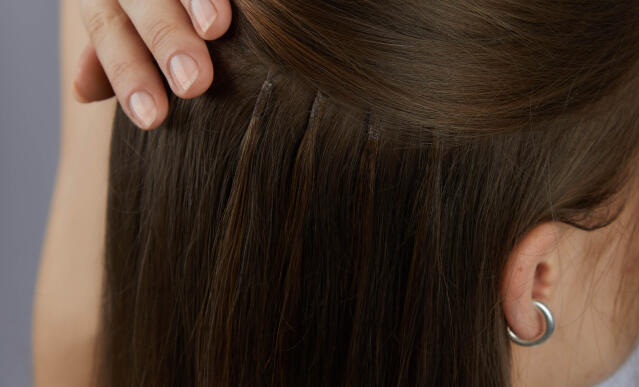
How do I insert Keratin Extensions?
To insert the Keratin Extensions, you will need the fusion connector, clips, protective pads, pintail comb and hair grippers.
Insertion procedure
- Wash your hair. Use shampoo only. Dry it thoroughly and brush it.
- Use the pintail comb to divide your hair into sections. Secure the sections with clips.
- Take a section of your own hair. It should be as wide as the Keratin Extensions attachment and look like a semicircle. Use the hair grippers to secure loose hairs that might otherwise get in the way.
- Place a protective pad around the section and then a Keratin Extension under your own section of hair, approx. 0.5 cm from the hairline.
- Melt the keratin attachment with the fusion connector designed for Keratin Extensions. Use two fingers to shape the attachment into a grain of rice around your own hair.
- Place the next section one finger’s width away from the previous one and repeat steps 3–5 with the remaining Keratin Extensions.
Tip! Cut the keratin attachment vertically to create smaller attachments at the sides of the face.
Inserting curly Keratin Extensions
- Wash your hair. Use shampoo only. Dry your hair completely and detangle with a wide tooth comb.
- Maintain the natural texture of your own hair.
- Divide your hair into sections.
- Take a section of your own hair. It should be as wide as the Keratin Extensions attachment and look like a semicircle. Make sure the selected section matches the thickness and texture of the extension section.
- Place a protective pad around the section and then a Keratin Extension under your own section of hair, approx. 0.5 cm from the hairline.
- Melt the keratin attachment with the fusion connector designed for Keratin Extensions. Use two fingers to shape the attachment into a grain of rice around your own hair.
- Repeat steps 3–5 with the remaining Keratin Extensions.
After insertion. Please note:
- Do not wash or style your hair for at least two days after inserting Premium Keratin Extensions
- Check the attachments after 6 weeks
- Insertions can stay in for up to 3 months
- When removing Premium Keratin Extensions, use Hair Extension Remover
How many packs of Keratin Extensions/Nail Hair do I need?
We recommend using approx. 5–6 packs of Premium Keratin Extensions for a full hair extension, depending on how thick your hair is. If you have naturally thick hair or want to achieve very thick or long hair, you may need 7–10 packs. If you want to add volume to your hair with Premium Keratin Extensions, we recommend 2 packs of 20 pieces and 1 pack of 10 pieces, depending on the desired result.
- If you are attaching a few hair extensions (about 1–4 packs), distribute the extensions in three sections, with the first parting level with the top of the ear. Then work your way up until you achieve the desired result.
- If you want to add volume with approx. 5–6 packs of hair extensions, distribute the extensions in three sections, with the first parting level with the top of the ear. Next, distribute the extensions in two additional sections on either side of the head. Place these at the same height as the top parting, facing diagonally upwards and at an angle in front of the ear.
- If you want really thick hair and are using 7-10 packs of extensions or more, we recommend distributing the extensions in 5 sections, with the first parting level with the bottom of the ear. Next, distribute the extensions in three additional sections on either side of the head. Start at the same height as the top parting, diagonally upwards and at an angle in front of the ear.
Colour Effects
If you want to wear extensions for colour effects or to mix colours, it may be a good idea to choose the colour that is most similar to your own hair closest to the hairline and the upper row – in this way your attachments will be invisible and blend in well.
Washing Keratin Extensions/Nail Hair extensions
To keep your hair and hair extensions looking their best for longer, it’s important to provide them with plenty of moisture and nourishment. Apply Rapunzel hair care products to your hair. Use a detangling brush to remove any tangles. And read our care tips for further recommendations.
- Start by separating your hair with your fingers and brushing it while dry. Rinse with lukewarm water and apply shampoo. Massage the shampoo in a downward motion without rubbing. Rinse thoroughly, then gently squeeze out the water.Wash with shampoo a second time.
- Use a deep conditioning treatment 1–2 times a week or as required. After shampooing, apply a generous amount of conditioning treatment to the lengths and ends. Avoid using conditioner and deep conditioning treatment close to the attachments as these can cause them to loosen. Leave on for at least 10 minutes, preferably longer. Rinse with lukewarm water, then gently squeeze out the water and apply conditioner to the lengths and ends. Rinse thoroughly, then gently squeeze out the water with a towel.
- For best results and less breakage, dry the attachments with a hair dryer at very low heat and the rest of the hair at low heat and low speed. Don’t forget heat protection! Brush through the hair when it’s completely dry.
Styling Keratin Extensions/Nail Hair
After inserting your Keratin Extensions/Nail Hair, you may need to trim them to create a nice transition to your own hair. Our Keratin Extensions/Nail Hair with straight hair can be styled just like your own hair. When using curling tongs, a straightener, hairdryer or other styling tools on your extensions, always use heat protection and do not expose the hair to temperatures higher than 180°C. When styling your hair with heat, you should avoid applying heat close to the attachments. Heat can cause the attachments to melt and loosen.
Removing Keratin Extensions/Nail Hair
To remove your Keratin Extension/Nail Hair, use remover and Keratin Extension/Nail Hair pliers. Part the hair like when you put the extensions in and remove each extension individually, section by section. Apply remover to the attachment. Use the pliers to gently break loose the attachment. Create cracks in the attachment with the pliers until it becomes porous. If necessary, apply additional remover and carefully pull out the extension. If the attachment is stubborn, apply more remover, loosen with pliers and gently pull again. Comb out any residue with a pin tail comb.